
Tiny Crochet Pokeball Pattern
A pokeball is certainly no exception either, so many of us out there love pokemon, so what better way to show our love than to make a tiny pokeball?
I'll even show you how to attach the pokeball to a keychain to make it portable so you can catch 'em all on the go!
Not a miniature enthusiast? That's ok! You can follow this pattern with regular yarn and any size hook-a win for all!
If you like, you can also take a peek at the video tutorial I made for this pattern on my YouTube channel. Click the link to the left →
Or click this link ↓
Materials:
-1.50 mm crochet hook
-1.50 mm crochet hook
-red embroidery thread (DMC 817)
-black embroidery thread ( I used DMC 310)
-white embroidery thread (DMC blanc)
-scissors
-fiber fill
-tapestry needle
Optional:
-stitch marker (I use a little gold safety pin)
-a stick for stuffing (I use a chopstick)
-keychain (you can usually find these at a craft store)
-white embroidery thread (DMC blanc)
-scissors
-fiber fill
-tapestry needle
Optional:
-stitch marker (I use a little gold safety pin)
-a stick for stuffing (I use a chopstick)
-keychain (you can usually find these at a craft store)

Abbreviations:
RND round
sc single crochet
ch chain
inc increase
st stitch
dec decrease (sc dec single crochet decrease)
RND round
sc single crochet
ch chain
inc increase
st stitch
dec decrease (sc dec single crochet decrease)
BLO back loops only
** repeat around
** repeat around
Pattern:
Pokeball Body
Starting at the top of the pokeball with your red color.
(RND 1) 6 sc in magic ring (6)
(RND 2) *2 sc inc, sc in next st* (9)
(RND 3) *2 sc inc, sc in next 2 st* (12)
(RND 4) *2 sc inc, sc in next 3 st* (15)
(RND 3) *2 sc inc, sc in next 2 st* (12)
(RND 4) *2 sc inc, sc in next 3 st* (15)
(RND 5) sc in each st around (15)
Switch to your black color, you don't have to worry about making a seamless color change either. We will be covering up the mismatched stitch rounds with the release latch of the pokeball, so just continue crocheting around with your new color. 😃
(RND 6) sc in each st around (15)
Switch to your white color.
(RND 7) sc in each st around (15)
(RND 8) *dec, sc in next 2 st* (12)
Stuff all thread ends inside and proceed to begin stuffing the pokeball with small amounts of polyester fiber fill.
(RND 9) *dec, sc in next st* (9)
Stuff more if needed.
(RND 10) Work in BLO and dec around until the pokeball is closed
With your tapestry needle, fasten off the white thread end. Be careful to only work in and out of the holes in between the stitches of the shape.
Release Latch
With your white color,
sc 3 in magic ring, close the ring and sl in the next stitch (completing a circular shape). You can push the middle through the stiches in order to flatten the shape more.
Switch to your black color,
2 sc inc around for a total of 6 black stitches. sl to close the circle.
Be sure to cut a rather long tail of the black thread so you can sew the latch to the body of the pokeball.
Find the spot on the ball that looks a little uneven from where you joined the colors and sew the non-working thread ends (there should be 2 white and 1 black) start in that spot through to the back of the ball, being careful to again, sew in and out of the holes in between the stitches of the shape.
I like to put all 3 of my non-working thread ends through the eye of my tapestry needle and sew them all through together. There is also no need to tie them in a know on the other side, there are just a loose anchor for now.
Next, thread your long black thread end and begin sewing the latch to the pokeball. Weave in and out of the 6 stitches of the latch and sew through the pokeball. It is not critical to sew in and out of the holes here, just through the top surface anywhere near the latch will do.
Fasten off, being careful to sew in and out of the holes in between the stitches.
If you want to attach a keychain then you can just attach it to the pokeball with some pliers that you might use to make jewelry, or you can try my way:
With your red color 6 sc in a magic ring in RND 1 and before you go to close the magic ring, insert one of the metal loops of the keychain and close the magic ring around the metal loop.
Proceed to crochet around the keychain link and the pokeball will take shape around the keychain. You can even use the non-working red thread end that is hidden inside to tie a knot around the metal loop of the keychain to secure it even more.
See pictures below for more clear instruction: 👍
Starting at the top of the pokeball with your red color.
(RND 1) 6 sc in magic ring (6)


 |
Keep going until you have 9 stitches.

(RND 3) *2 sc inc, sc in next 2 st* (12)
(RND 4) *2 sc inc, sc in next 3 st* (15)
(RND 4) *2 sc inc, sc in next 3 st* (15)


Keep going until you have 15 stitches. You can decide if you would like a stitch marker for the next round.
(RND 5) sc in each st around (15)


Cut the working thread end.


Tighten the thread you just cut by giving it a little tug.

Insert your hook into the next stitch and attach your black color.


(RND 6) sc in each st around (15)


Continue all the way around. You can tug on the red thread end to tighten the stitch if it came a little loose before you complete your last stitch with the black thread.


Cut your black working thread end.

Give all your thread ends little tugs to tighten the stitches in this area.


Continue around by attaching your white color into the next stitch.


(RND 7) sc in each st around (15)


Continue crocheting around.


Give the black non-working thread end a tug if it needs it so you can complete the round.


(RND 8) *dec, sc in next 2 st* (12)


I like to take a moment here to tuck all my non-working thread ends inside. You could also add some stuffing too if you like.


(RND 9) *dec, sc in next st* (9)


Add more stuffing until the shape is pretty firm.


(RND 10) Work in BLO and dec around until the pokeball is closed


Once closed, cut the working thread end.


With your tapestry needle, fasten off the white thread end. Be careful to only work in and out of the holes in between the stitches of the shape.


Tie a knot on the other side. Re-insert needle into same hole and pull through another hole on the other side of the pokeball. Tug just enough to pull the know into the pokeball, securing the thread and hiding the knot.


Cut the thread end.

Squish the ball here and there to give it a more round shape.

Release Latch
With your white color,
sc 3 in magic ring


Close the ring and sl in the next stitch (completing a circular shape)


You can push the middle through the stiches in order to flatten the shape more.


Cut working thread end.


Switch to your black color,
2 sc inc around for a total of 6 black stitches.


Keep going all the way around and it should start to look something like this:

sl to close the circle


Be sure to cut a rather long tail of the black thread so you can sew the latch to the body of the pokeball.

Find your non-working thread ends (there should be 2 white and 1 black) and you can cut them all to make their ends even so it is easear to thread them all together through your tapestry needle.


Find the spot on the ball that looks a little uneven from where you joined the colors and start in that spot through to the back of the ball, being careful to again, sew in and out of the holes in between the stitches of the shape.
I like to put all 3 of my non-working thread ends through the eye of my tapestry needle and sew them all through together. There is also no need to tie them in a know on the other side, there are just a loose anchor for now.


Next, thread your long black thread end and begin sewing the latch to the pokeball.

Weave in and out of the 6 stitches of the latch and sew through the pokeball.


It is not critical to sew in and out of the holes here, just through the top surface anywhere near the latch will do.


Fasten off, being careful to sew in and out of the holes in between the stitches.


Tie a knot, re-insert needle into same hole and pull through another hole on the other side of the pokeball. Tug just enough to pull the know into the pokeball, securing the thread and hiding the knot.


Cut off all the thread ends and you should be ready to catch some Pokemon!


Give little squishes here and there to perfect the round shape of the pokeball.


If you want to attach a keychain then you can just attach it to the pokeball with some pliers that you might use to make jewelry, or you can try my way:

With your red color 6 sc in a magic ring in RND 1 and before you go to close the magic ring, insert one of the metal loops of the keychain and close the magic ring around the metal loop.


You can even use the non-working red thread end that is hidden inside to tie a knot around the metal loop of the keychain to secure it even more.
Insert hook through metal circle

Pull non-working thread through

Thread over and pull through the loop on your hook securing the thread to the keychain loop.


Tie another regular knot for extra security.


Proceed to crochet around the keychain link and the pokeball will take shape around the keychain.


Ta-da! A miniature pokeball keychain-or a regular sized pokeball depending on the hook size you used!

Please share your Pokeball with me!
Teeny Tiny Pokeballs are cute, but stealing is not!
Please be sure to give credit where credit is due when sharing.
No selling of this pattern in any form is permitted.
©Alexandria Gold 2019
Tiny Hello Kitty Face
Follow along on YouTube! Check out the tutorial here:
https://www.youtube.com/watch?v=lNqqSaSispk&t=323s

Materials:
-1.50 mm crochet hook
-white embroidery thread (I used DMC blanc)
-yellow embroidery thread (DMC 444)
-black embroidery thread ( I used DMC 310)
-any color of embroidery thread for the bow (Red: DMC 817)
-scissors
-fiber fill
-tapestry needle
Optional:
-stitch marker (I use a little gold safety pin)
-a stick for stuffing (I use a chopstick)
-glue gun
-jewelry pliers (for attaching earring hook, if you want to make earrings)
-a pair of earrings (you can buy these at any craft store that has a jewelry section)
Abbreviations:
RND round
sc single crochet
ch chain
inc increase
st stitch
dec decrease (sc dec single crochet decrease)
** repeat around
Pattern:
Head, with white embroidery thread
(RND 1) 3 sc in magic ring (3)
(RND 2) 2 sc inc in each st around (6)
(RND 3) 2 sc inc, sc in next st, *ch 3, sc in 2nd ch from hook, 2 sc in last ch, 2 sc inc in next st, sc* (repeat this last part just one more time) (9)
(RND 4) *2 sc inc, sc in next 2 st* (be sure to only work in the original stitches, skip over the ear shapes) (12)
(RND 5) *2 sc inc, sc in next 3 st* (15)
(RND 6-7) sc in each st around (15)
(RND 8) *dec, sc in next 2 st* (12)
-Tuck in the non working thread end-
(RND 10) *dec, sc in next st* (9)
-stuff-
(RND 11) dec around until closed
With your tapestry needle, fasten off the white thread end into Hello Kitty's head. Be careful to only work in and out of the holes in between the stitches of the shape.
Hello Kitty Face, with yellow and black thread
First of all, always be sure to be sewing in and out of the holes in between the stitches.
Nose, with yellow thread (DMC 444)
Choose a hole that is in the middle of the front of Hello Kitty to be her nose. On the other side of her head, insert your needle and aim for the nose hole.
Tie a knot, then re-insert your needle into the same hole and pull the thread out of the back part of her head, where you can fasten off.
Eyes & Whiskers, with black thread (DMC 310)
You will sew on her eyes the same way you sewed on her nose. Refer to the picture of Hello Kitty to decide where her eyes will be in relation to where you sewed on her nose.
I like to start with the right eye and then move to the left eye.
Once I am done with the eyes, I move on to the whiskers. I always start with the middle whisker, then make the top and bottom whisker. From the left eye I work to the left in and out of the holes in between the stitches that run parallel to the eye.
Once you are done with the left side, repeat the same thing on the right side, beginning with the middle whisker, then the top and bottom.
As you are sewing the last whisker, aim for a hole that is at the back of Hello Kitty's head to fasten off.
Bow, with any color
In a magic ring, *ch 2, 2 hdc, ch 2, sl* repeat this once more and then close the ring.
Cut your working thread end to a length similar to your non working thread end and then tie them in a double knot on one side. Make sure to tie the knot extra tight to really push the shape of the bow.
From here, you can either sew the bow to Hello Kitty's head, or cut the thread ends short and use your glue gun to attach the bow to Hello Kitty's right ear.
Once the bow is attached, you're done!
Unless... You want to make earrings!!
Make another Hello Kitty head, and then use your jewelry pliers to open up the ring that is at one end of the earring hook.
Next, pick a stitch at the top of Hello Kitty's head and use your tapestry needle to loosen the top of the stitch. Try to pick a stitch that is towards the middle of her head, and just work your needle in and out of the stitch to loosen it until you begin to see a loop taking shape.
When the loop is big enough, you can slip the open ring of the earring hook through and then use your jewelry pliers to close the ring in order to secure Hello Kitty to the earring.
Repeat this with your other Hello Kitty and you will have a pair of earrings! Everyone will not only think they are super adorable, they will be super impressed to learn that you made them all on your own!
Step By Step:
(RND 1) 3 sc in magic ring (3)
As you go to close the ring, push the stitches up through the middle of the ring you are tightening.


(RND 2) 2 sc inc in each st around (6)
I like to essentially crochet inside out so I can make the ears in a continuous round and not have any attachments. Due to this, you will have to maneuver your needle as you complete the first stitch of this round so you can conceal your non-working thread end with in the head shape.
Thread over and pull through the first stitch. Then remove your hook form the loop you just made and move it under the non-working thread end.
Re-insert your needle into your loop and then proceed to complete your first sc while making sure to pull the non-working thread end away from your needle and the sc you are making.
After this, you can complete your inc in this stitch and finish increasing around.


(RND 3) 2 sc inc, sc in next st, *ch 3, sc in 2nd ch from hook, 2 sc in last ch, 2 sc inc in next st, sc* (repeat this last part just one more time) (9)
In this round you will complete the ear shape in a continuos round.
 |
| Ch 3 is the beginning of the ear shape |
 |
| Proceed to sc in the ch's |


 |
| At the end of this round, you should be able to see the ear shapes. Continue on to RND 4. |
In this round, be sure to only work in the original stitches, skip over the ear shapes. As you skip over the ear shape and insert your needle into the stitch that is just after the ear shape, thread over and pull through and pull on your working thread end to tighten the loops on your hook.
You can also tug the ear shape upward as you tighten the loops to bring the stitches even closer together.
By doing this, you are moving the stitches closer together over the ear shape in order to ensure that there is no giant hole in between your stitches.


 |
| Once you are done with the round, the shape will look something like this. Then you can continue on to the fifth round. |
(RND 5) *2 sc inc, sc in next 3 st* (15)
(RND 6-7) sc in each st around (15)


(RND 8) *dec, sc in next 2 st* (12)

-Tuck in the non working thread end-
You can use your stuffing stick to help with this if you like.


(RND 10) *dec, sc in next st* (9)

-stuff-
Roll up small amounts of doll stuffing at a time and proceed to use your stuffing stick (I use a chopstick) to stuff Hello Kitty's head.


(RND 11) dec around until closed
With your tapestry needle, fasten off the white thread end into Hello Kitty's head. Be careful to only work in and out of the holes in between the stitches of the shape.


Hello Kitty Face, with yellow and black thread
First of all, always be sure to be sewing in and out of the holes in between the stitches.
Nose, with yellow thread (DMC 444)
Choose a hole that is in the middle of the front of Hello Kitty to be her nose. On the other side of her head, insert your needle and aim for the nose hole.


Tug on your thread just hard enough to pull the knot into Hello Kitty's head. Then tie a knot on the front side to create her nose.


Then re-insert your needle into the same hole and pull the thread out of the back part of her head, where you can fasten off.

 |
| Fasten Off |
Eyes & Whiskers, with black thread (DMC 310)
I like to start with the right eye and then move to the left eye.
Once I am done with the eyes, I move on to the whiskers. I always start with the middle whisker, then make the top and bottom whisker. From the left eye I work to the left in and out of the holes in between the stitches that run parallel to the eye.
Once you are done with the left side, repeat the same thing on the right side, beginning with the middle whisker, then the top and bottom.
As you are sewing the last whisker, aim for a hole that is at the back of Hello Kitty's head to fasten off.


Once I am done with the eyes, I move on to the whiskers. I always start with the middle whisker, then make the top and bottom whisker. From the left eye I work to the left in and out of the holes in between the stitches that run parallel to the eye.


Once you are done with the left side, repeat the same thing on the right side, beginning with the middle whisker, then the top and bottom.


As you are sewing the last whisker, aim for a hole that is at the back of Hello Kitty's head to fasten off.


Bow, with any color
In a magic ring, *ch 2, 2 hdc, ch 2, sl* repeat this once more and then close the ring.
Cut your working thread end to a length similar to your non working thread end and then tie them in a double knot on one side. Make sure to tie the knot extra tight to really push the shape of the bow.
From here, you can either sew the bow to Hello Kitty's head, or cut the thread ends short and use your glue gun to attach the bow to Hello Kitty's right ear.


Before repeating what you just did, you can move your stitches closer together so they don't take up a lot of space on your ring and you can have more room to create the other side of the bow.
You can also remove your finger from the ring at this point and finish creating your stitches into the ring.


Repeat, ch 2, 2 hdc, ch 2, sl into the magic ring and go ahead and close the ring.


Cut your working thread end to a length similar to your non working thread end and then tie them in a double knot on one side. Make sure to tie the knot extra tight to really push the shape of the bow.


From here, you can either sew the bow to Hello Kitty's head, or cut the thread ends short and use your glue gun to attach the bow to Hello Kitty's right ear.


Making Earrings
Make another Hello Kitty head, and then use your jewelry pliers to open up the ring that is at one end of the earring hook.
Next, pick a stitch at the top of Hello Kitty's head and use your tapestry needle to loosen the top of the stitch. Try to pick a stitch that is towards the middle of her head, and just work your needle in and out of the stitch to loosen it until you begin to see a loop taking shape.
When the loop is big enough, you can slip the open ring of the earring hook through and then use your jewelry pliers to close the ring in order to secure Hello Kitty to the earring.
Repeat this with your other Hello Kitty and you will have a pair of earrings! Everyone will not only think they are super adorable, they will be super impressed to learn that you made them all on your own!


Next, pick a stitch at the top of Hello Kitty's head and use your tapestry needle to loosen the top of the stitch. Try to pick a stitch that is towards the middle of her head, and just work your needle in and out of the stitch to loosen it until you begin to see a loop taking shape.


When the loop is big enough, you can slip the open ring of the earring hook through and then use your jewelry pliers to close the ring in order to secure Hello Kitty to the earring.


Repeat this with your other Hello Kitty and you will have a pair of earrings! Everyone will not only think they are super adorable, they will be super impressed to learn that you made them all on your own!


Please share your Hello Kitty with me! I love to see other's creations! 😍
Teeny Tiny Hello Kitties are cute, but stealing is not!
Please be sure to give credit where credit is due when sharing.
No selling of this pattern in any form is permitted.
©Alexandria Gold 2017
Tiny Crochet Pumpkin Pie

Materials:
-2.00 mm crochet hook
-orange or warm brown colored yarn
-gold or tan yarn
-scissors
-fiber fill
-tapestry needle
Optional:
-stitch marker (I use a little gold safety pin)
-a stick for stuffing (I use a chopstick)
Abbreviations:
RND round
sc single crochet
ch chain
inc increase
st stitch
sts stitches
dec decrease (sc dec single crochet decrease)
** repeat around
Pattern:
Pie filling, with orange yarn
(RND 1) 6 sc in magic ring (6)
(RND 2) 2 sc inc in each st around (12)
(RND 3) *2 sc inc, sc in next st* (18)
(RND 4) *2 sc inc, sc in next 2 st* (24)
(RND 5) *2 sc inc, sc in next 3 st* (30)
Fasten off the orange yarn ends by sewing them to the back side of the pie filling.
Pie Crust, with gold yarn
(RND 1) 6 sc in magic ring (6)
(RND 2) 2 sc inc in each st around (12)
(RND 3) *2 sc inc, sc in next st* (18)
(RND 4) *2 sc inc, sc in next 2 st* (24)
(RND 5) *2 sc inc, sc in next 3 st* (30)
(RND 6) *hdc & sc in next st, sc & hdc in next st, sl in next st* (this will be the ridges around the top of the crust)
Leave a long tail for sewing the crust to the pie filling. Sew just under the ridges on the pie crust in and out of the outer loops of the RND 5 stitches of the pie filling.
Just before you are about the sew the pie closed, begin stuffing small amounts of doll stuffing into the opening a little bit at a time. Once you are happy with the amount of stuffing, go ahead and sew the pie all the way closed and proceed to fasten off.
Whipped Cream, with white yarn
ch 10
sc in next 3 sts beginning in the 2nd ch from the hook
hdc in the next 3 sts
dc in the last 3 sts
Leave a long tail for sewing.
Curl the the piece around itself to create a little swirly shape. Use the long tail to sew the shape you just made into place.
Then attach the whipped cream by first sewing the smaller thread end that you have from your foundation ch directly through the center of the pie.
Continue to secure the whipped cream to the top of the pie by sewing with your long tail end. Sew into the tops of the stitches on the pie filling to make attaching the piece easier.
Fasten off the white thread ends.


Pie filling, with orange yarn
(RND 1) 6 sc in magic ring (6)
(RND 2) 2 sc inc in each st around (12)
(RND 3) *2 sc inc, sc in next st* (18)
(RND 4) *2 sc inc, sc in next 2 st* (24)
(RND 5) *2 sc inc, sc in next 3 st* (30)

Fasten off the orange yarn ends by sewing them to the back side of the pie filling.


Pie Crust, with gold yarn
(RND 1) 6 sc in magic ring (6)
(RND 2) 2 sc inc in each st around (12)
(RND 3) *2 sc inc, sc in next st* (18)
(RND 4) *2 sc inc, sc in next 2 st* (24)
(RND 5) *2 sc inc, sc in next 3 st* (30)

(RND 6) *hdc & sc in next st, sc & hdc in next st, sl in next st*
(this will be the ridges around the top of the crust)


Leave a long tail for sewing the crust to the pie filling.
Sew just
under the ridges on the pie crust
in and out of the sts of
RND 5 of the pie filling.


Just before you are about the sew the pie closed, begin stuffing small
amounts of
doll stuffing into the opening a little bit at a time.


Once
you are happy with the amount of stuffing, go ahead and sew
the pie all
the way closed and proceed to fasten off.


Whipped Cream, with white yarn
ch 10
sc in next 3 sts beginning in the 2nd ch from the hook
hdc in the next 3 sts
dc in the last 3 sts
Leave a long tail for sewing.

Curl the the piece around itself to create a little swirly shape.


Use the long tail to sew the shape you just made into place.


Then attach the whipped cream by first sewing the smaller thread end
that you
have from your foundation ch directly through the center of the
pie.


Continue to secure the whipped cream to the top of the pie by sewing
with your long tail end.
Sew into the tops of the stitches on the pie
filling to make attaching the piece easier.


Fasten off the white thread ends.

You're all done!! If you want to make them even cuter,
you can sew a little face just below the whipped cream with some black embroidery thread.
See the photo above to see the style of face I sewed onto my pie :-)
Teeny Tiny Pumpkin Crochet with Spooky Face
Video available:
https://www.youtube.com/watch?v=CQXhT7K78C0

-1.50 mm crochet hook
-orange embroidery thread (I used DMC 741)
-green embroidery thread ( I used Iris 963)
-black embroidery thread ( I used DMC 310)
-scissors
-fiber fill
-tapestry needle
Optional:
-stitch marker (I use a little gold safety pin)
-a stick for stuffing (I use a chopstick)
Abbreviations:
RND round
sc single crochet
ch chain
inc increase
st stitch
dec decrease (sc dec single crochet decrease)
** repeat around
Pattern:
Body, with orange embroidery thread
(RND 1) 3 sc in magic ring (3)
(RND 2) 2 sc inc in each st around (6)
(RND 3) *2 sc inc, sc in next st* (9)
(RND 4) *2 sc inc, sc in next 2 st* (12)
(RND 5) *2 sc inc, sc in next 3 st* (15)
(RND 6-8) sc in each st around (15)
(RND 9) *dec, sc in next 2 st* (12)
(RND 10) *dec, sc in next st* (9)
stuff, pretty firm
(RND 11) dec around until pretty much closed
With your tapestry needle, fasten off the orange ends into the pumpkins body. Be careful to only work in and out of the holes in between the stitches of the pumpkin.
Stem, with green embroidery thread
Pick any stitch at the top of your pumpkin where you were decreasing. Insert your hook through one of the stitches and thread over with the green thread. Pull the thread through the stitch and proceed to ch 6
sl in each ch starting in the second ch from hook
Pick another stitch at the top of your pumpkin to sl the stem into
Cut the working end and proceed to fasten off the green thread like the threads of the pumpkin's body were fastened off.
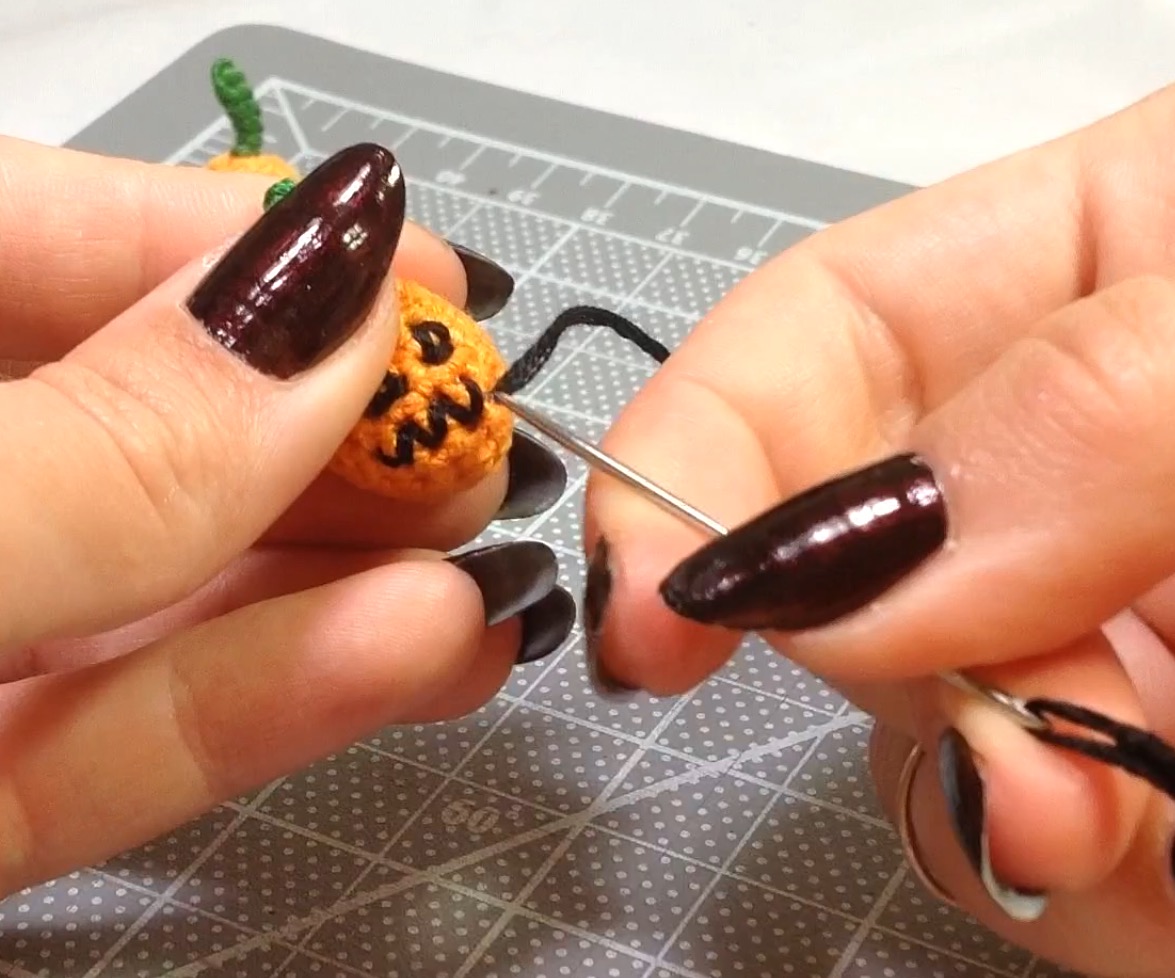
Face, with black thread
Sew thread onto the pumpkin like the picture to create the face while always sewing in and out of the holes in between the stitches.
Fasten off the working thread end, and then you're done!
Step by Step:


Pattern:
Body, with orange thread
(RND 1) 3 sc in magic ring (3)
Loosen the loop on your hook as shown above before proceeding to the next round.


Insert your hook into the first stitch of the next round, thread over and pull through the stitch (two loops on your hook). Now pull your working end to tighten both loops on your hook while pushing the shape you made up between the working loops (as shown above). This ensures that the base of your pumpkin will be flat.
(RND 2) 2 sc inc in each st around (6)

(RND 3) *2 sc inc, sc in next st* (9)
(RND 4) *2 sc inc, sc in next 2 st* (12)
(RND 5) *2 sc inc, sc in next 3 st* (15)


(RND 6-8) sc in each st around (15)

(RND 9) *dec, sc in next 2 st* (12)
(RND 10) *dec, sc in next st* (9)


Stuff the pumpkin
(RND 11) dec around until closed
Cut working end of the thread


Fasten off the orange thread ends by sewing them into the pumpkin's body with your tapestry needle. Sew into the holes in between the stitches. Pull the needle out of the other side of the pumpkin and snip off the tail with your scissors.
Stem, with green thread
ch 6, sl in each ch starting in second ch from hook, sl stem to body


Pick any stitch at the top of your pumpkin where you were decreasing. Insert your hook through one of the stitches and thread over with the green thread. Pull the thread through the stitch and proceed to ch 6.


ch 6, sl in each ch starting in the second ch from hook


Pick another stitch at the top of your pumpkin to sl the stem into.


Cut the working end and proceed to fasten off the green thread like the threads of the pumpkin's body were fastened off.
Face:
Thread your tapestry needle with your black thread, tying a knot at one end. We will start with the left eye. Decide where you want the tip of the left triangle eye to begin, then insert your needle through a whole on the backside of the pumpkin and aim fro the hole that will mark the top of your triangle with your needle.


Once you have pulled the thread through the hole on the other side, pull the thread hard enough so that the knot on the other end is pulled into the body of the pumpkin. This will secure the thread while hiding our knot.


Begin to weave the thread in and out of the three holes that will make up the left eye. Right before completing the eye, decide which hole will mark the tip top of the right eye. Then aim your needle to that hole as you complete the last stitch of the left eye.


Follow the same steps for the right eye as you did with the left, but right before completing the right eye, decide which hole will mark the beginning of the pumpkin's mouth.
I start on the left and work my way over to the right.

Sew in a zig zag pattern in and out of the holes along the front of the pumpkin to create the mouth.
When you have reached the desired length of your pumpkin's mouth, pull the thread through a hole on the back of the pumpkin.


Tie a knot close to the pumpkin's body and then re-insert the needle into the hole under the knot and pull the needle through to another hole on another side of the pumpkin.


Pull the working end hard enough to pull the knot into the pumpkin's body to secure the face stitches and hide the knot.
Snip off the working end close to the pumpkin's body with your scissors.

Then admire your finished miniature pumpkin!
Easy Pumpkin Crochet
 |
| If you decide to follow along, I'd love to see your pumpkin! So please share, just give credit! Thanks! |
Materials:

-2.00 mm crochet hook
-orange yarn
-green yarn
-scissors
-fiber fill
-tapestry needle
Optional:
-stitch marker (I use a little gold safety pin)
-a stick for stuffing (I use a chopstick)
Abbreviations:
RND round
sc single crochet
ch chain
inc increase
st stitch
dec decrease (sc dec single crochet decrease)
** repeat around
Pattern:
Body, with orange yarn
(RND 1) 6 sc in magic ring (6)
(RND 2) 2 sc inc in each st around (12)
(RND 3) *2 sc inc, sc in next st* (18)
(RND 4) *2 sc inc, sc in next 2 st* (24)
(RND 5-8) sc in each st around (24)
(RND 9) *dec, sc in next 2 st* (18)
(RND 10) *dec, sc in next st* (12)
stuff, pretty firm
Leave a long tail for sewing.
With your tapestry needle threaded, insert into the top of pumpkin (where your suffing opening is) down through the bottom center of the pumpkin, come back up around and sew into the top again.
When you pull the needle through the bottom center of the pumpkin this time, pull the yarn tightly to create the ridge look on the pumpkin's body. Repeat about four more times.
Fasten off orange yarn ends.
Stem, with green yarn
(RND 1) 6 sc in magic ring (6)
(RND 2) sc in each st around (6)
(RND 3) *dec, sc in next st* (3)
(RND 4-5) sc in each st around (3)
Leave a long tail for sewing and sew the stem into the top of the pumpkin.
Fasten off green yarn ends, and then you're done!
Step by Step:
 |
| (RND 1) 6 sc in magic ring (6) (RND 2) 2 sc inc in each st around (12) (RND 3) *2 sc inc, sc in next st* (18) (RND 4) *2 sc inc, sc in next 2 st* (24) |
 |
| (RND 5-8) sc in each st around (24) |
 |
| (RND 9) *dec, sc in next 2 st* (18) (RND 10) *dec, sc in next st* (12) stuff, pretty firm |
 |
| Leave a long tail for sewing. With your tapestry needle threaded, insert into the top of pumpkin (where your suffing opening is) down through the bottom center of the pumpkin. |
 |
| Come back up around and sew into the top again. |
 |
When you pull the needle through the bottom center of the pumpkin
this time, pull the yarn tightly to create the ridge look on the
pumpkin's body. Repeat about four more times.  |
Fasten off
 | |
| (RND 1) 6 sc in magic ring (6) (RND 2) sc in each st around (6) (RND 3) *dec, sc in next st* (3) (RND 4-5) sc in each st around (3) |


 | ||
| Leave a long tail for sewing and sew the stem into the top of the pumpkin. |
 | ||
| Fasten off green thread. |
 |
| You're Done! |
Mini Totoro!

This pattern is for a teeny tiny totoro! It is a little tricky and best for more experienced crocheties, but you can follow the pattern all the same with any size hook or yarn you are most comfortable with because a bigger size can make this pattern easier to follow.
Also! I have a video, so you can follow along on YouTube too:
https://www.youtube.com/watch?v=2rnBxHg51sI
I love seeing people's work, so share with me!
Materials:
Crochet Hook 1.50mm
Embroidery Thread DMC 844 & 310
White Thread
Sewing Needle
Tapestry Needle
Small Amount of Polyester Fiber Fill (Doll Stuffing)
Small Piece of White Felt
Chopstick (or something with a pointy end for stuffing)
Scissors
0.05 Pen (to mark sewing points for face & chest details, optional)
Small Gold Safety Pin (for stitch marker, optional)
** I work in a continuous round and that includes any little body limbs- In this case, Totoro's ears and tail.
Abbreviations:
RND round
sc single crochet
ch chain
inc increase
st stitch
dec decrease (sc dec single crochet decrease)
Pattern:
RND 1 3 sc in magic ring (3)


RND 2 2 sc inc in next st, ch 3, sc in each ch starting in 2nd ch from hook, 2 sc inc in next st,
ch 3, sc in each ch starting in 2nd ch from hook, 2 sc inc in last st (6)


RND 3 2 sc inc in next sc, sc in next sc, reapeat around in remaining stitches (9)
 | ||
| **Skip over the ears you made and continue working in the next st |
RND 5 2 sc inc in next st, sc in next 2 st, repeat around in remaining stitches (12)
RND 6 sc in each st around (12)
RND 7 2 sc inc in next st, sc in next 3 st, repeat around in remaining stitches (15)
 | |
| **You can use a stitch marker after RND 7 if you like, sometimes I'm distracted by Netflix when I crochet ;-) |
RND 9 sc in next 2 sc, ch 2, sc in 2nd ch (last ch) from hook, sc in next st and each remaining st around (15)
 |
| **Depending on your tension, you may only need one sc before making the tail. The tail should be made at the middle of Totoro's back, so you can estimate. |
RND 10 sc dec, sc in next 3 st, repeat around in remaining stitches (12)


**Skip over the tail and continue working in the next st
RND 11 sc dec, sc in next 2 st, repeat around in remaining stitches (9)
At this point, it's time to stuff! Use your pointy end (I like a chopstick) to begin stuffing small amount of polyester fiber fill into your Totoro's body.

Use your thumb to poke his booty up so it becomes a little flat so he can stand upright.
Take a tapestry needle and fasten off the two tails.


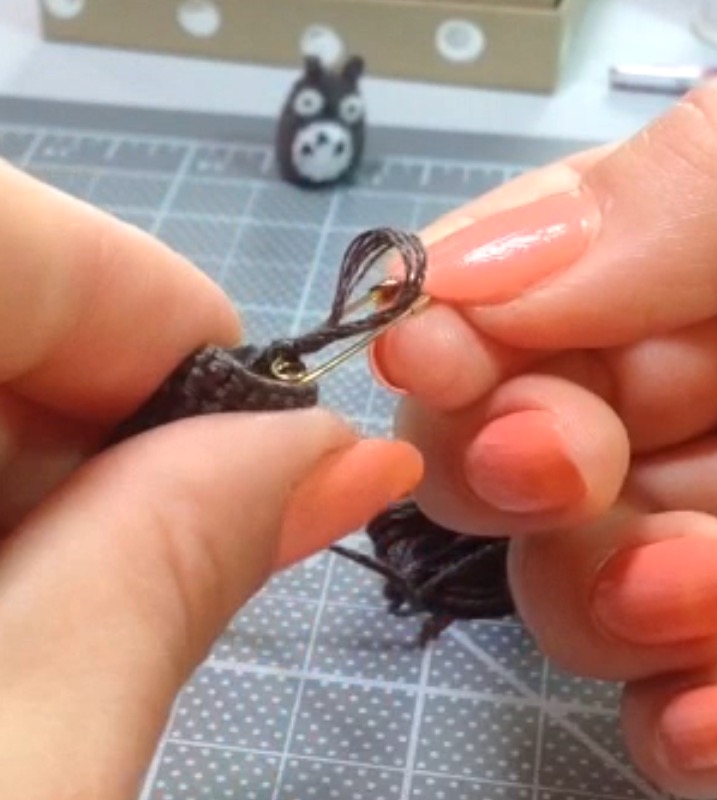
Next, cut out three small pieces of white felt, two small for the eyes and one bigger for the chest (as shown).
Lay them up against Totoro's body to begin cutting out circles to be sewn onto Totoro's body.
I just eyeball it until the pieces are about the size and shape I like, but you could trace out circles on the felt if that is easier. Just cut inside the line that you drew so your markings can no longer be seen.


Once you have your eyes circles cut out, you can use a 0.05 pen to put a dot on the felt to mark where you will sew the knot that will be Totoro's eye.
Just make sure that the side with the mark will be the side facing down on Totoro's body so no one can see the pen mark in case you sew a little off the mark.

Thread 3 of the strands onto your tapestry needle and put the needle through the backside of Totoro through to his front side and the tiny piece of felt (through the dot you made with the pen).
Sew the eyeball on with a knot. You can do an FK knot back through the felt and Totoro's body if you wish.
Once you have made your knot (or FK knot), insert the needle under you knot and through to the other side of Totoro's head to sew on the second eye.


Insert the needle under the second's eye's knot to the middle of Totoro's face to make a nose.
Sew a knot (or FK knot) onto the surface of Totoro's face and insert the needle back into Totoro's body through to his back where you can fasten off the thread.


You can use your 0.05 pen to mark sewing dots again too.


Insert the needle into Totoro's back, in order to hide you knot and pull it through the front of Totoro and the chest piece.


Fasten off once you have sewn all the way around by inserting the needle through to the back side of Totoro.


TA-DA!

Please share your Totoro with me!
Teeny Tiny Totoros are cute, but stealing is not!
Please be sure to give credit where credit is due when sharing.
No selling of this pattern in any form is permitted.
©Alexandria Gold 2016
No comments:
Post a Comment